Raspberry Pi Pico Rubberducky
You can turn your Raspberry Pi Pico into a Rubberducky USB.
Quick Start Guide
Install and have your USB Rubber Ducky working in less than 5 minutes.
-
Download the latest release from the Releases page.
-
Plug the device into a USB port while holding the boot button. It will show up as a removable media device named
RPI-RP2. -
Install CircuitPython on the Pico or Pico W If using a Pico board: Copy the
adafruit-circuitpython-raspberry_pi_pico-en_US-8.0.0.uf2file to the root of the Pico (RPI-RP2). The device will reboot and after a second or so, it will reconnect asCIRCUITPY.If using a Pico W board: Copy the
adafruit-circuitpython-raspberry_pi_pico_w-en_US-8.0.0.uf2file to the root of the Pico (RPI-RP2). The device will reboot and after a second or so, it will reconnect asCIRCUITPY. -
Copy the
libfolder to the root of theCIRCUITPY -
Copy
*.pyto the root of theCIRCUITPY -
Follow the instructions in
README.mdto enter setup mode -
Copy your payload as
payload.ddto the root of theCIRCUITPY -
Unplug the device from the USB port and remove the setup jumper.
Enjoy your Pico-Ducky.
Setup Mode
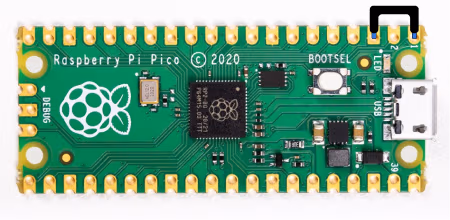
To edit the payload, enter setup mode by connecting the pin 1 (GP0) to pin 3 (GND), this will stop the pico-ducky from injecting the payload in your own machine. The easiest way to do so is by using a jumper wire between those pins as seen bellow.
USB enable/disable mode
If you need the pico-ducky to not show up as a USB mass storage device for stealth, follow these instructions.
- Enter setup mode.
- Copy your payload script to the pico-ducky.
- Disconnect the pico from your host PC.
- Connect a jumper wire between pin 18 (
GND) and pin 20 (GPIO15). This will prevent the pico-ducky from showing up as a USB drive when plugged into the target computer. - Remove the jumper and reconnect to your PC to reprogram.
Pico: The default mode is USB mass storage enabled.
Pico W: The default mode is USB mass storage disabled
Pico W Web Service
The Pico W AP defaults to ip address 192.168.4.1. You should be able to find the webservice at http://192.168.4.1:80
The following endpoints are available on the webservice:
//new/ducky/edit/<filename>/write/<filename>/run/<filename>
API endpoints
/api/run/<filenumber>